minicondaでPython3.5とPython2.7の共存環境を構築する
- condaでの共存環境も作りやすくなったし
- minicondaでPython3.5とPython2.7の共存環境を構築する
- 最近みんな3系なので(汗)
- anacondaを入れている時は削除する
- anacondaを入れていると邪魔なので削除します。(インストールしていない方は読み飛ばしてください)
- まずはコマンドで削除
- PythonのPATHを消す
- Anacondaのショートカット削除
現在のバージョンを確認
python -V
Python 2.7.13 :: Anaconda 4.3.1 (x86_64)
入ってますねー。アンインストールしましょう
conda install anaconda-clean     (これだけでは消えない)
anaconda-clean                   (これだけでは消えない)
rm -rf anaconda                  (消す)
rm -rf AnacondaProjects          (消す)
私のマシンには以下のように入っていたので.bash_profileから消しました。(zsh使っている人はたぶん.zshrc)
# added by Anaconda3 4.3.1 installer
export PATH="/Users/Suzuki_Yasuharu/anaconda/bin/python:$PATH"
アプリケーションフォルダ内にAnacondaのショートカットの残骸が残っている

→ Finderから削除
- minicondaのインストール
- ダウンロードしたファイルからインストール
- 利用規約で「press ENTER to continue」と聞かれる
- Do you approve the license terms? [yes|no]と聞かれる
- Miniconda3 will now be installed into this location:
chmod 777 ./Miniconda3*
./Miniconda3-latest-MacOSX-x86_64.sh
→ ENTERキーを押し続ける。
→ YESと答える
/Users/ユーザー名/miniconda3

→ ENTER
- Python2.7 / Python3.5 のセットアップ
- condaのupdate
- 現在のバージョンを確認
- python仮想環境を作る
- エラー
- 3.5系への入り方
- 2.7系への入り方
先にconda自身をupdateしておく
conda update conda
python -V
Python 3.6.1 :: Continuum Analytics, Inc.
3.5系
conda create -n py35 python=3.5 anaconda

2.7系
conda create -n py27 python=2.7 anaconda
※3系のanacondaを入れたあとで2系を入れるとダウンロード量が多いので注意。
このエラーが出た時は unset PYTHONPATH する。
Failed to import the site module Your PYTHONPATH points to a site-packages dir for Python 2.x but you are running Python 3.x! PYTHONPATH is currently: ":/usr/local/lib/python2.7/site-packages/" You should `unset PYTHONPATH` to fix this.source activate py35 (仮想環境に入る) python -V Python 3.5.3 :: Anaconda 4.4.0 (x86_64) (3.5系になっている) source deactivate (仮想環境から出る)
source activate py27 (仮想環境に入る)
python -V
Python 2.7.13 :: Anaconda, Inc.     (2.7系になっている)
source deactivate (仮想環境から出る)
- Jupyterのセットアップ
- インストール
- 起動
- pandasのインストール
普通に入れると3.6だけでなく、3.5系 / 2.7系でも動きます。
conda install jupyter
jupyter notebook
pip install 〜 は conda install 〜でインストールします。
conda install pandas
Laravel MixのbrowserSyncで.cssや.jsの変更もリロードさせる
- Laravel MixのbrowserSyncで
- .cssや.jsの変更もリロードさせる
- もう調べるのめんどいから標準でつけてぇ〜(心の叫び)
- browserSyncの拡張を使う
- webpack.mix.js
webpack.mix.jsの最後にこれを追加
// Hot reloadingを有効にする (npm run watchで実行してください)
mix.browserSync({
    files: [
        "resources/views/**/*.blade.php",
        "public/**/*.*"     // 公開フォルダを指定しないとリロードが効きません。注意
    ],
    proxy: {
        target: "http://my-domain.dev/",
    }
});
これだけっす〜(・ω・)ノシ
Vagrant使ってみた(MacにVagrant+VirtualBox(CentOS7)をインストール)
- 今さらだけど
- Vagrant 使ってみた
- WEBエンジニアみんな使ってるので使ってみた
- vagrantのインストール
- VirtualBoxのインストール
- ダウンロード
- ダウンロード
次にVirtualBox。ここ↓からダウンロード
https://www.virtualbox.org/wiki/Downloads
VirtualBox 5.1.22 (2017/07/08 時点の最新)
[OS X hosts]をクリックしてダウンロード
VirtualBox.pkgをダブルクリック(インストーラを起動)
あとは指示に従ってインストールするだけ。
- Boxの追加
- ダウンロードURL一覧ページへ
- ダウンロード
- boxの確認
- VMの作成&起動
- ~/Vagrant/CentOS70を作業ディレクトリにする。
- 初期化コマンド
- 起動
- 状態の確認
- Vagrantへ接続
- 停止
- 初めて使った感想
$ mkdir -p ~/Vagrant/CentOS70 $ cd ~/Vagrant/CentOS70/
$ vagrant init centos70 A `Vagrantfile` has been placed in this directory. You are now ready to `vagrant up` your first virtual environment! Please read the comments in the Vagrantfile as well as documentation on `vagrantup.com` for more information on using Vagrant.
これで Vagrantfile 完成。確認してみる。$ ls Vagrantfile
$ vagrant up Bringing machine 'default' up with 'virtualbox' provider... ==> default: Importing base box 'centos70'... ==> default: Matching MAC address for NAT networking... ==> default: Setting the name of the VM: CentOS70_default_1499570759675_77339 ==> default: Clearing any previously set forwarded ports... ==> default: Clearing any previously set network interfaces... ==> default: Preparing network interfaces based on configuration... default: Adapter 1: nat ==> default: Forwarding ports... default: 22 (guest) => 2222 (host) (adapter 1) ==> default: Booting VM... ==> default: Waiting for machine to boot. This may take a few minutes... default: SSH address: 127.0.0.1:2222 default: SSH username: vagrant default: SSH auth method: private key default: default: Vagrant insecure key detected. Vagrant will automatically replace default: this with a newly generated keypair for better security. default: default: Inserting generated public key within guest... default: Removing insecure key from the guest if it's present... default: Key inserted! Disconnecting and reconnecting using new SSH key... ==> default: Machine booted and ready! ==> default: Checking for guest additions in VM... default: The guest additions on this VM do not match the installed version of default: VirtualBox! In most cases this is fine, but in rare cases it can default: prevent things such as shared folders from working properly. If you see default: shared folder errors, please make sure the guest additions within the default: virtual machine match the version of VirtualBox you have installed on default: your host and reload your VM. default: default: Guest Additions Version: 4.3.28 default: VirtualBox Version: 5.1 ==> default: Mounting shared folders... default: /vagrant => /Users/y.suzuki/Vagrant/CentOS70VirtualBoxを見るとCentOSが起動している。
$ vagrant status Current machine states: default running (virtualbox) The VM is running. To stop this VM, you can run `vagrant halt` to shut it down forcefully, or you can run `vagrant suspend` to simply suspend the virtual machine. In either case, to restart it again, simply run `vagrant up`.
$ vagrant ssh Last login: Thu Jul 16 08:48:31 2015 from 10.0.2.2 Welcome to your Vagrant-built virtual machine. [vagrant@localhost ~]$ exit logout Connection to 127.0.0.1 closed.
$ vagrant halt ==> default: Attempting graceful shutdown of VM...
とりあえずここまで(`・ω・´)ゞ
くっそ便利
Box : VagrantのOSイメージみたいなもの
Boxはここ↓にダウンロードURLの一覧がある
http://www.vagrantbox.es/
実際にダウンロードするときはコマンドを打つ

今回は以下をダウンロード
CentOS 7.0 x64 (Minimal, VirtualBox Guest Additions 4.3.28, Puppet 3.8.1 - see here for more infos)
URLをコピーしておく
以下のコマンドでboxを追加
vagrant box add {name} {url}
{name}はcentos64にして実行。20分ぐらいかかりました。vagrant box add centos64 https://github.com/tommy-muehle/puppet-vagrant-boxes/releases/download/1.1.0/centos-7.0-x86_64.box
boxの確認コマンドを打つ$ vagrant box list centos64 (virtualbox, 0)
CentOSのバージョン名に、box名を変更$ cd ~/.vagrant.d/boxes/ $ mv centos64 centos70
で変更完了。確認してみる。$ vagrant box list centos70 (virtualbox, 0)
CocoaPods 使ってみた(iOS開発)
- 今さらだけど
- CocoaPods 使ってみた
- ゼロから構築するのはひさびさだったのでブログにしてみた
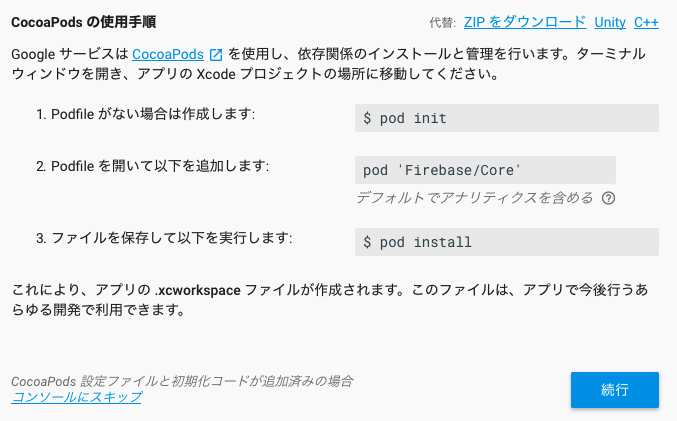
- CocoaPodsのインストール
- ruby gemを最新にする
- インストール
- セットアップ
sudo gem update --system
sudo gem install -n /usr/local/bin cocoapods
pod setup
- CocoaPodsを使う
- プロジェクトフォルダへ移動
- pod init
- Firebaseを追加
- .xcworkspace から起動
cd /Users/Suzuki_Yasuharu/Documents/Project/..../
"pod init"とコマンドを打ちます。pod init
Podfileというファイルが作成されます。# Uncomment the next line to define a global platform for your project # platform :ios, '9.0' target 'ys_test01' do # Comment the next line if you're not using Swift and don't want to use dynamic frameworks use_frameworks! # Pods for ys_test01 end
試しにFirebaseをCocoaPodsに追加してみます。
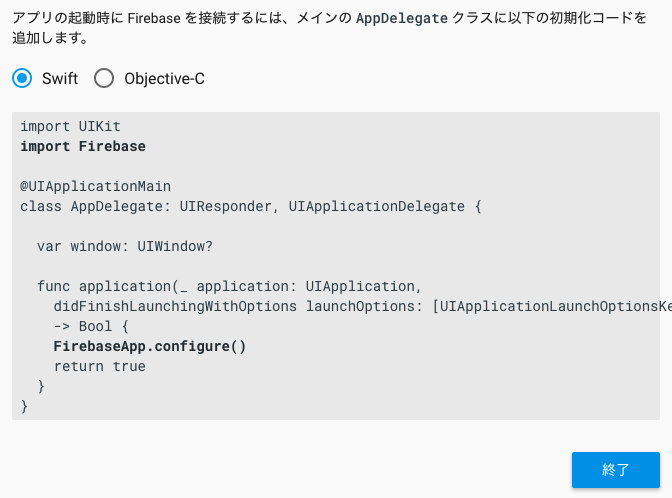
Firebase用の設定ファイル「GoogleService-Info.plist」を追加
Podfileを編集 → pod install
AppDelegate で FirebaseApp.configure() を呼ぶ
これでFirebaseの組み込みは終了です。
CocoaPods初心者がハマるやつです。

普段はプロジェクトを開くために .xcodeproj から起動しますが、CocoaPodsをインストールした後は、.xcworkspace から起動します。- ライブラリを追加する場合
- CocoaPodsライブラリを新たに追加したい場合
Podfileに別のライブラリ情報を記入後、
pod update
このコマンドでライブラリが追加されます。
Carthage 使ってみた(iOS開発)
参考サイト
Carthageを使ってビルド時間を短縮しよう
http://qiita.com/yutat93/items/97fe9bc2bf2e97da7ec1
Homebrewの導入
ruby -e "$(curl -fsSL https://raw.githubusercontent.com/Homebrew/install/master/install)"
brew update
Carthageの導入
brew install carthage
Carthageで外部ライブラリを導入
1.ライブラリを導入したいプロジェクトのディレクトリへ移動
cd /Users/Suzuki_Yasuharu/Documents/Project/....../ys_test01
2.Cartfileを作成
touch Cartfile
3.Cartfileを編集
vim Cartfile
外部ライブラリ情報を記述。
github "SnapKit/SnapKit"
4.外部ライブラリをビルド
carthage update --platform iOS
結構時間がかかる。
carthage updateだけでもビルドは可能だが、OSX用や、watchOS用もビルドされてしまうので、
iOS用のみをビルドするよう指定。
5.プロジェクトに外部ライブラリを追加
まずプロジェクトファイルのGeneralタブから、
「Linked Frameworks and Library」にある+ボタンを押します。
Frameworksを選択する画面になるので、「Add Other...」を選択。
プロジェクトのディレクトリ内から、Carthage/Build/iOSと移動し、
ライブラリの.frameworkファイル(SnapKit.framework)を選択。
ライブラリが追加できたら、Build Phasesタブに移動し、
+ボタンから、「New Run Script Phase」を選択。
「Run Script」が現れる。
ここでまず「Shell」の下にある黒い部分に以下のコマンドを記述。
/usr/local/bin/carthage copy-frameworks
そして次に「input Files」にて+ボタンを押し、以下のようにframeworkの情報を記述します。
$(SRCROOT)/Carthage/Build/iOS/Snapkit.framework
これで全ての設定が完了。
あとは必要なところでimportして使うだけです。(以下はSnapKitのテストコード)
import SnapKit
let label = UILabel()
label.text = "TEST!"
label.textAlignment = NSTextAlignment.center
label.backgroundColor = UIColor.brown
view.addSubview(label)
label.snp.makeConstraints { (make) in
  make.size.equalTo(100)
  make.center.equalToSuperview()
}
 |
|
 |
|
こんな感じか(・ω・)
Dockerって結局実サービスでは使ってないんだけど最近どうなん?と思って調べてみた
Dockerって結局実サービスでは使ってないんだけど最近どうなん?と思って調べてみた。
1つのサーバにいろいろ混在させるとなると環境を汚すのが怖い
遊びの環境だしDockerで分けられないかな?
1コマンドで作った。Dockerで開発環境を構築する方法
http://sitest.jp/blog/?p=8823
おさらい。Vagrant + Docker + ansible。図解がすごくわかりやすい。
2014/10 今さら聞けない【コンテナ/仮想化技術】11選
http://paiza.hatenablog.com/entry/2014/10/21/知らぬはエンジニアの恥。今さら聞けない【コン
仮想化・コンテナ技術の歴史。わかりやすい。長いけど読め。
2014/11 Dockerは速いのか?Dockerのパフォーマンスについて重要なことは何か?
http://blog.yuuk.io/entry/docker-performance
"Docker の本番投入の問題はパフォーマンス云々以上に、既存のワークフローにいかに組み込むかと
問題が発生したときのデバッグまたは障害対応であるというのがここ半年くらいの認識になっている。"
うむ(・ω・)よいまとめ。
docker-syncでホスト-コンテナ間を爆速で同期する
http://qiita.com/pocari/items/0340049742927f3a94b7
docker for Mac は遅いので使うな、と。
Dockerの本番運用:失敗の歴史
http://postd.cc/docker-in-production-an-update/
Dockerは使うな、と。AWSならギリギリ「あり」か。
さくらのVPSにdocker環境構築
http://qiita.com/t-mimura/items/c206d46f3af771292f89
一応作ってる人はいるみたいですね。
Amazon Lightsail 調べてみた(料金とかさくらとの比較とか)
そういやさくらのVPSより安い$5で使えるLightsailはSSL使えたりしないのかな?
と思って調べてみた。
超便利そうな Amazon Lightsail の落とし穴を確認してみる
http://blog.serverworks.co.jp/tech/2016/12/02/lightsail/
Amazon Lightsailの課金まとめ #reinvent
http://dev.classmethod.jp/cloud/aws/lightsail-m/
static ipは $0.005/時間 ($3.6/月) なので合計$8.6となるとあまり料金の利点はない。
1TB超えると転送料金が$90/TB掛かるのもちょっと怖い。
【さくらのレンタルサーバ】基本仕様
https://help.sakura.ad.jp/hc/ja/articles/206053142
スタンダードで80GB/日で制限。個人利用&小規模利用が前提なのでこれで十分。
Amazon Lightsailで起動したWordPressのSSLサーバ証明書を調べてみた #reinvent
http://dev.classmethod.jp/cloud/aws/lightsail-ssl-crt/
入っているのはオレオレ。購入必要。
